🎮 How to turn your computer into a Gaming Console
RESULTS:
- The old version
- The new version (Still on the making of the video)
Now that you saw how it is, lets go to the requirements:
- Windows 10 (Should work on Win11 too, but I didn't test it)
- A nice video that will be your intro (The duration depends on how good your PC is, I will use a 15s one)
- Playnite installed and logged with your launchers (Just the initial settup is good enough)
- Your game launchers XD (I have just GOG and Steam here)
Win10 Activation
- If your windows already is a Enterprise version, just skip this step
- If not, follow it, of course
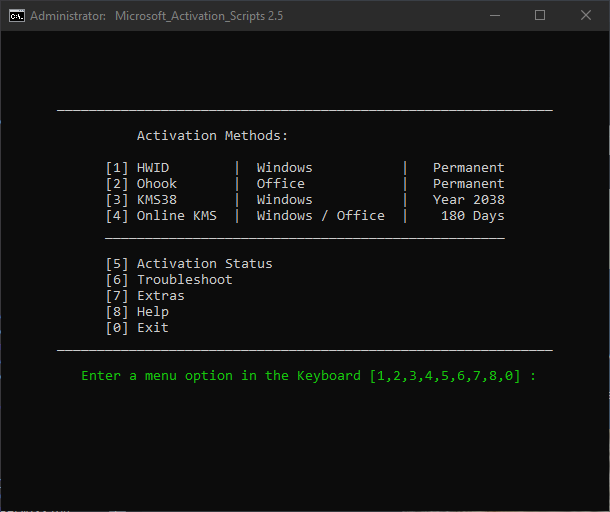
- Open Power Shell
- Type
irm https://massgrave.dev/get | iex - It will open something like this:
- If you windows is already activated:
- Type
7, then type1 - When it asks you the edition, chose the one that says "Enterprise"
- Reboot
- Be happy =)
- Type
- If you are lazy and never activated it:
- Type
1 - If it asks you the edition, chose the one that says "IOTEnterprise"
- Reboot
- Be happy =)
- Type
Win10 Brandless boot
- First of all, make sure your account is an admin one
- Then let's setup the auto-loggin:
- Open PowerShell and type
irm https://christitus.com/win | iex - Go to
Configand click onSet Up Autologin - Type your password (If you have one) in the boxes and confirm
- If you want, have a look in the tool you opened, it is a really interesting one
- Open PowerShell and type
- Now lets remove all that junk from the beggining of the system
- Open CMD as Admin
- Type
bcdedit.exe -set {globalsettings} bootuxdisabled on - You can close CMD now lol
- Type
- Open the
Control Panel- Click on
Uninstall a Program - On the left bar, click on
Turn Windows features on or off - Find the tree called
Devide Lockdownand expand it - Check all these boxes:
- Custom Logon;
- Shell Launcher;
- Unbranded Boot;
- Click on
- Open CMD as Admin
- Now it's time to mess up with the registre hehehe, so open
regedit- Navigate until
Computer\HKEY_LOCAL_MACHINE\SOFTWARE\Microsoft\Windows Embedded\EmbeddedLogon - Double Click
HideAutoLogonUIand set it to 1 - Do the same with
HideFirstLogonAnimation
- Navigate until
- You can test it, reboot your system and it should be totally clear, from a black screen to your desktop.
Installing Playnite Plugins
- This is easy, I will list some links here with the plugin description. You just need to open the plugin page, click on "Download", allow the browser to open it on Playnite and confirm the instalation, as the print shows:

- Plugins list:
- Metadata
- SteamGridDB - Retrieve covers from SteamGridDB.
- Universal Steam Metadata - Retrieve metadata from Steam, even if the game is from another library.
- Generic
- DKG Theme Modifier - Use to configure themes that support it.
- Extra Metadata Loader - Provides additional information.
- Extra Metadata Fullscreen Mode Helper - Provides additional information in fullscreen mode.
- Game Pass Catalog Browser - Browse the Game Pass Catalog on Playnite (optional).
- Image Cache Size Saver - Saves space on your hard drive by processing images in the cache folder.
- Image Size Saver - Same as above, but for covers (adapted from here).
- Save File View - Shows the location of the game's save folder (optional).
- Splash Screen - Set an image or video to open before a game.
- SuccessStory - View your achievements (optional, but highly recommended).
- Themes
- Mythic - Optional
- Playnite Modern UI - One of the best themes available. Check out how to configure it in the General Settings
- Metadata
- This is easy, I will list some links here with the plugin description. You just need to open the plugin page, click on "Download", allow the browser to open it on Playnite and confirm the instalation, as the print shows:
Configurating Playnite
- Press F4 to open the settings menu.
- Access the
Generalsettings and configure them as follows: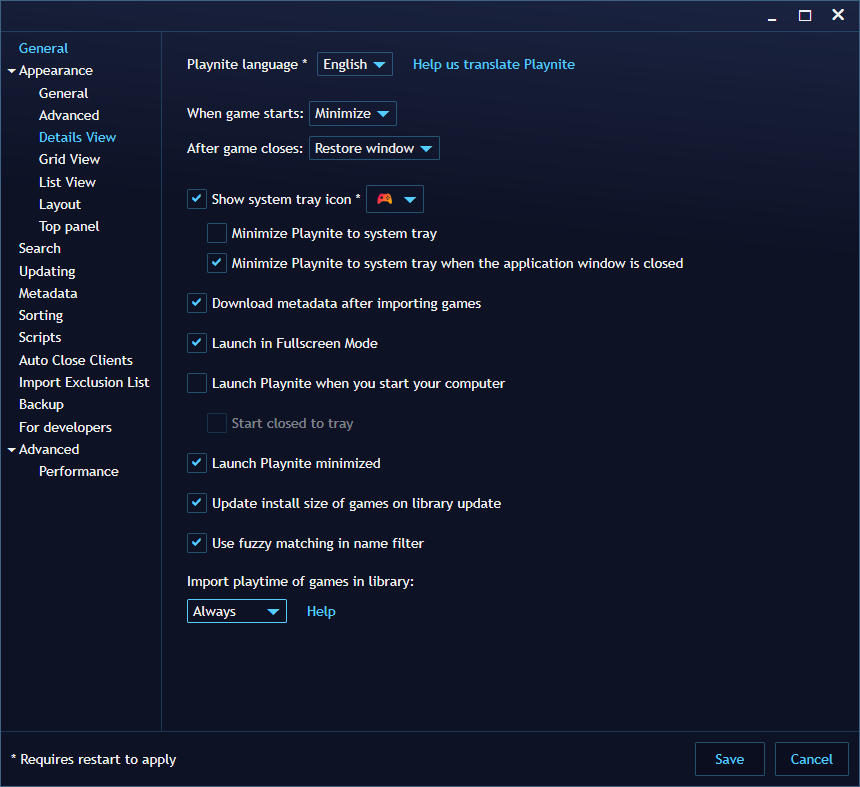
- On Apparence, select your theme (Mine is "Mythic")
- On
Metadata, click on the select and let it like this: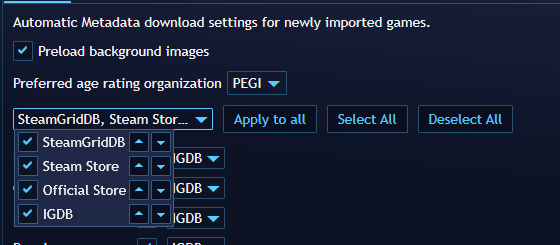
- Then click
Select Allbutton and finnalyApply to All - On
Auto Close Clients, select all clients and set a time limit that you believe is appropriate (I recommend 240 seconds). - Now you can close the config menu
- Press
Ctrl + d, it will open a download metadata screen - Select "All games from database" and uncheck the box asking to skip those who already have metadata
- Let it download all metadata
Configurating Pluggins
- Press F9 to open the plugin settings.
- Check for updates. If any are available, update the plugin and restart Playnite.
- If you use Amazon Games, check the box that says
Start games directly without running official client. - If you use Xbox, uncheck the boxes
Import not installed gamesandImport XBOX console games(This will prevent Playnite importing games that were on Game Pass in the past, you played and don’t have access anymore.) - Configure the other library extensions as you prefer.
- Create an account on SteamGridDB, then go here and copy your API Key.
- Back in Playnite, go to
Metadata Sources → SteamGridDBand paste your API Key where it is requested. No other changes are necessary. - On
Generic → DKG Theme Modifier(All of this you can see what fit you most)- Chose
PlayniteModernUI - Select your preferred color
- Mark the boxes
Background Stretch With FadeandBackground Blur - Mark the box
Rounded Cornersand set it to 15 - Click on
Apply changeson the button on the beggining of the page
- Chose
- On
Extra Metadata Loaderclick onDownload ffmpeg packageandDownload yt-dlp. Save these files to a location of your choice (I saved them inside the extension folder). Next, point the files to Playnite by clicking onBrowse… - Then, scroll to the end and let configure it as follow:

- Go to the
Game Pass Catalog Browserand select your country. Then, choose the boxes that best fit your preferences. - On
SuccessStory, enable the achievements you want to track. If you want to play retro games, check out RetroAchievements and get an API Key here. - On
Steam Launcher Utilitycheck the boxLaunch Steam in Big Picture Mode when starting a gamefrom theFullScreen Mode - Click
Save - Download Image Magick and install it wherever you want. Then, proceed with the steps on the image. (Do it with Image Size Saver too)

- If it asks for Image Magick, just point it to where you install it.
Quick Filter and Fulscreen
- Click on the Filter Icon
- Chose the filter that most suits you, in my case I will create a filter for PS2 games: ![Filter Settings]
- I put Library as Playnite to just have the games that run on the emulator. You can have some games on Steam that will also have “PlayStation2” as their platform along with PC.
- Click then on the Save icon
- The name must be one of these icons here (If the name isn’t one of these, the icon will be a default one)
- Click save
- Press
F11to open the Fullscreen vision - Click on the controller on the right-top corner
- Navigate to
Visualsand change:- Theme to
Playnite Modern UI - Check
Darken not installed games - Check
Show Background Image on Main Screen
- Theme to
- Navigate to
Layoutand change:- Columns to 6
- Rows to 2 (If you cant change it, uncheck
Horizontal Scrolling, change the Rows value and then check the box again) - Item Spacing to 40
- Of course, you can change to what fits your like
- Click on the Filter Icon
The experience
- Create somewhere a folder called
Scripts(I created it inside the Playnite folder) - Get your intro and move it to this folder, rename the video to "IntroVideo.mp4"
- Create a file called
Launch Playnite.bat - Edit the file to contains this code here: (Change the paths to your own)
@echo off start "" "D:\Playnite\Playnite.FullscreenApp.exe" --hidesplashscreen "D:\Playnite\tools\ffmpeg-6.0-essentials_build\bin\ffplay.exe" -i "D:\Playnite\!_Scripts\IntroVideo.mp4" -fs -alwaysontop -noborder -autoexit -loglevel quiet 2>NUL- Playnite currently does not support controllers with DirectInput. If you are not using a controller with XInput or a mouse and keyboard, Download XOutput to map your controllers to XInput.
- You will also need to add the following line to the start of Launch Playnite.bat file to start this XOutput on startup. The timeout is to prevent XOutput from starting on top of Playnite.
bash
start ""  "C:\Path\to\XOutput.exe"
timeout /t 1
- You will also need to add the following line to the start of Launch Playnite.bat file to start this XOutput on startup. The timeout is to prevent XOutput from starting on top of Playnite.
- Now we are going to convert the bat to an exe file
- Download this tool and extract it somewhere
- Open
BatToExeConverterX64.exe - Drag your .bat file to the program
- Check
Invisible Application,64 BitsandAdd administrator manifest - Click on compile
- Minimize the program (We are going to use it later)
- So lets make the system open our game library instead of all that Windows junk
- Create a new file
explorerShell.bat - Edit the file to contains this code here: (Change the paths to your own)
@echo off reg add "HKEY_LOCAL_MACHINE\SOFTWARE\Microsoft\Windows NT\CurrentVersion\Winlogon" /v Shell /t REG_SZ /d "explorer.exe" /f timeout /t 1 start explorer.exe timeout /t 1 reg add "HKEY_LOCAL_MACHINE\SOFTWARE\Microsoft\Windows NT\CurrentVersion\Winlogon" /v Shell /t REG_SZ /d "D: \Playnite\!_Scripts\Launch Playnite.exe" /f exit- Convert this one to an .exe too (Like we did earlier), but this time you don't need to check the Administrator manifest option
- Now open Regedit and navigate to
Computer\HKEY_LOCAL_MACHINE\SOFTWARE\Microsoft\Windows NT\CurrentVersion\Winlogon - Double Click on
Shelland change the value fromexplorer.exeto the path to yourLaunch Playnite.exefile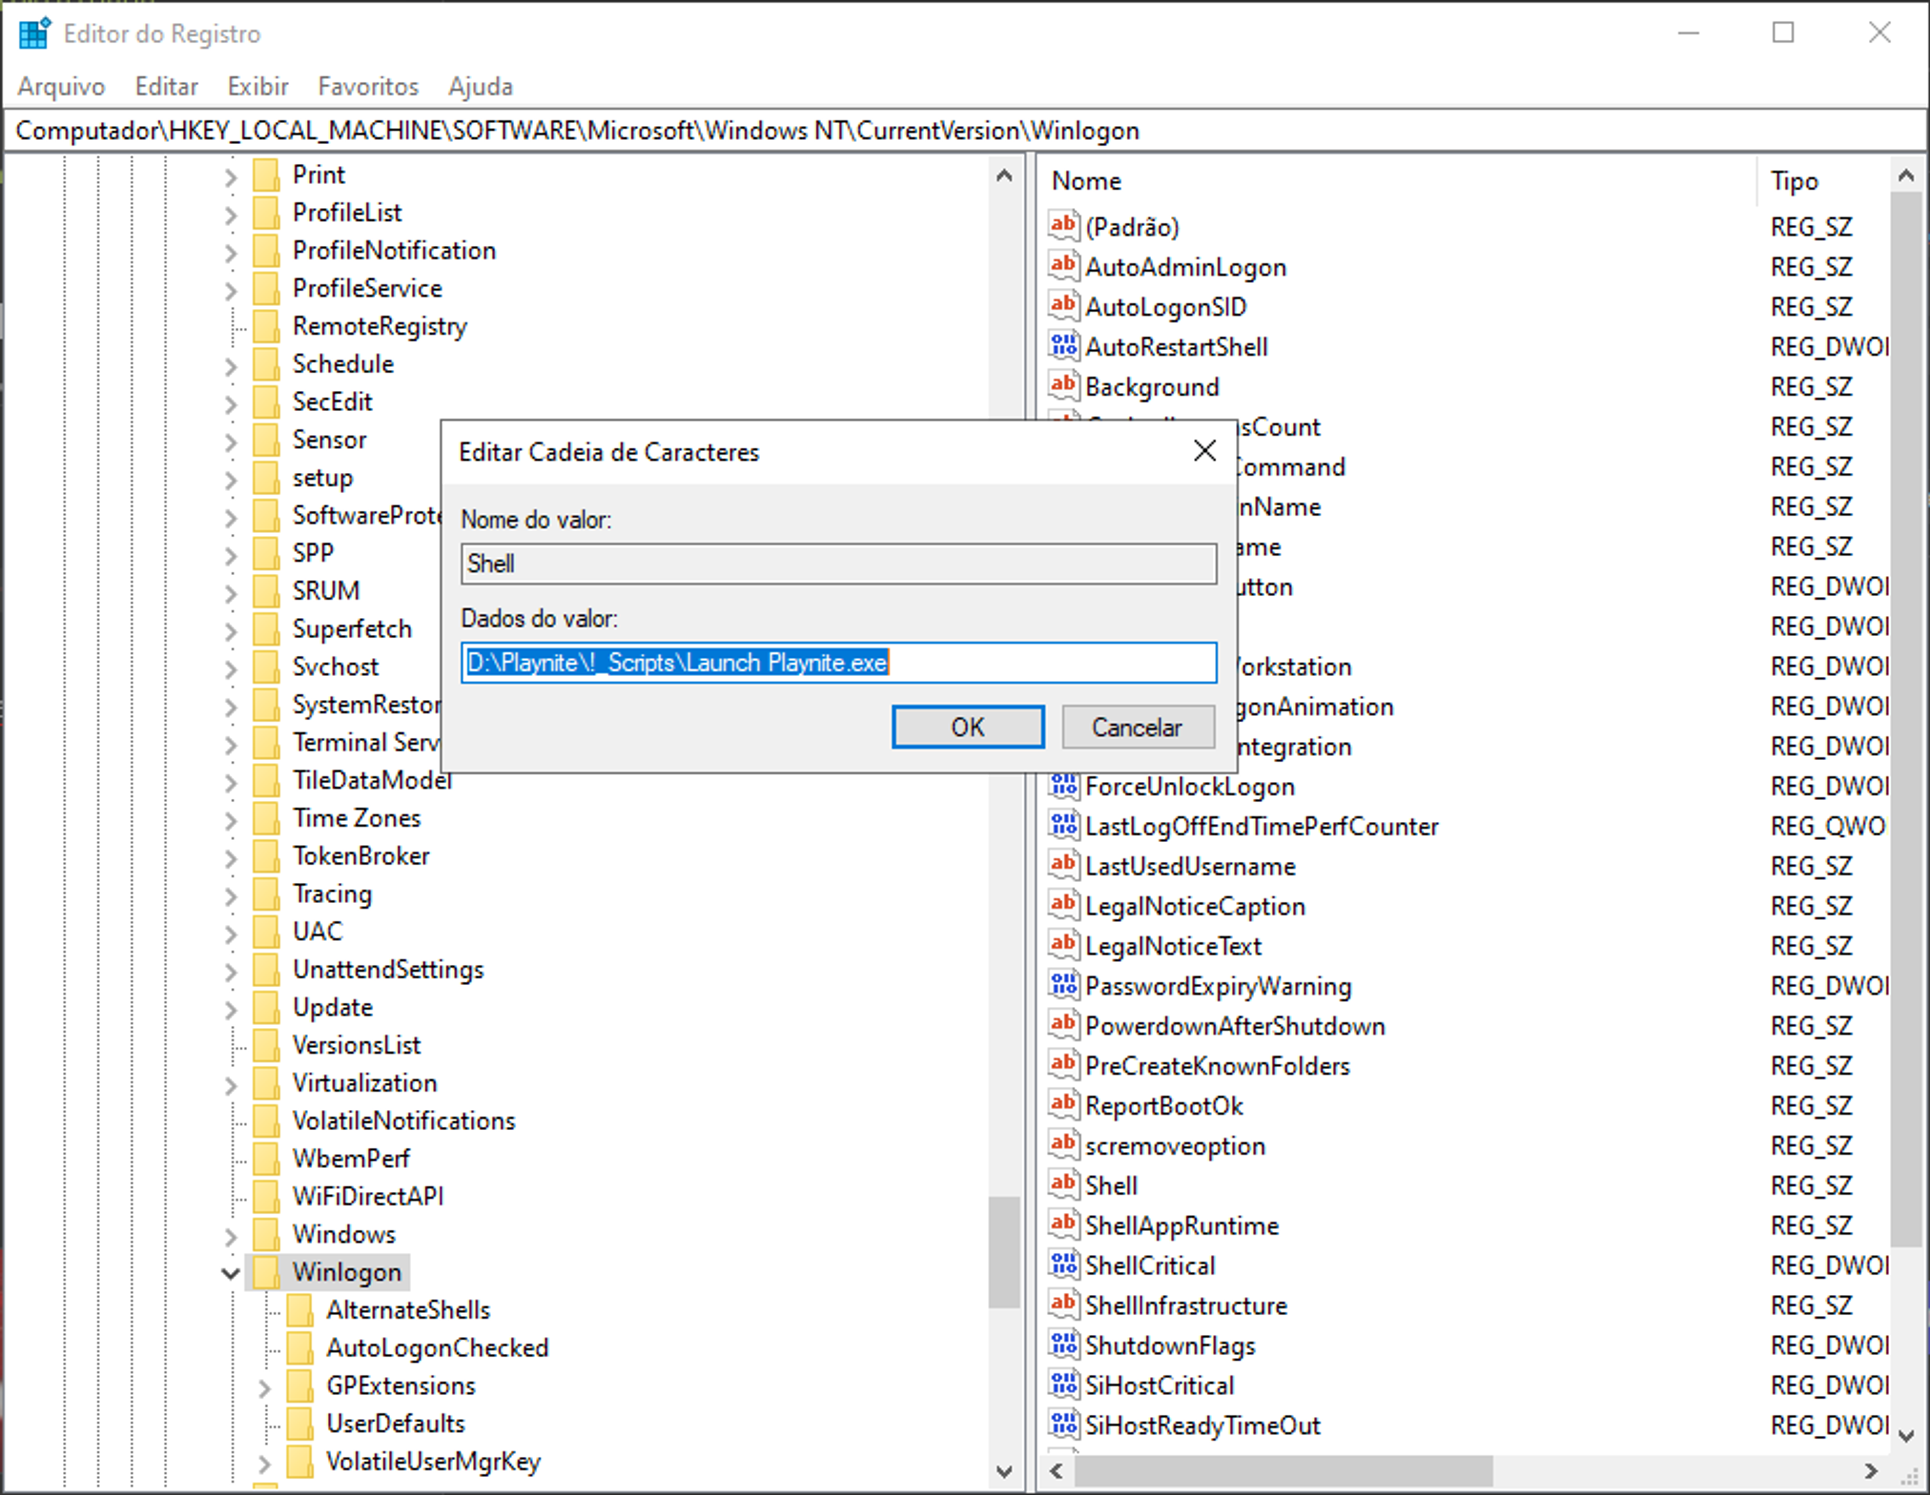
- Save it and close Regedit
- Create a new file
- Now to, in case you need, open Win10 again:
- On Playnite, press
Insertto add a game mannualy - Give it a name that you see fit
- On The
Actionstab, click onAdd Action - On Path, paste the path to your
explorerShell.exe - Save it and it's done! If you ever want/need to use your computer as a computer again, just run this "game"
- On Playnite, press
- Create somewhere a folder called
Fixing GamePass game not opening
- If you try to start a Game Pass game, you will be welcomed with an error. This is simple to solve, but you will need to do it for every game.
- Press F4 and navigate to
Scripts - On `Execute before starting a game, paste this: (Change the paths to your own)
$pluginGUID = $Game.PluginId
if ($pluginGUID -eq "7e4fbb5e-2ae3-48d4-8ba0-6b30e7a4e287") {
  $explorerRunning = Get-Process explorer -ErrorAction SilentlyContinue
  if (!$explorerRunning) {
   Start-Process "D:\Playnite\scripts\explorerShell.exe"
   timeout /t 30
  }
}